Kitchen Tool Tips – Knives

Cooking
Henckles Knives

Henckles Knives

Often overlooked is the kitchen knife.  Home cooks tend to use whatever they find at the department store or even a big box store.  This is not necessarily a bad knife, but once you use a professional chef’s knife in your kitchen, you will wonder why no one told you about his sooner!

Since I have been in the food service industry, I have supplied my friends advice and equipment to make their lives easier in their kitchens at home.  15 years ago, I gave one of my best friends a Wusthof knife that she has taken care of and still uses as her favorite kitchen tool to this day.  After she had used it the first time, she could not believe she had gone all these years with knives she had inherited from her mother and grandmother.

Wusthof Knives

Wusthof Knives

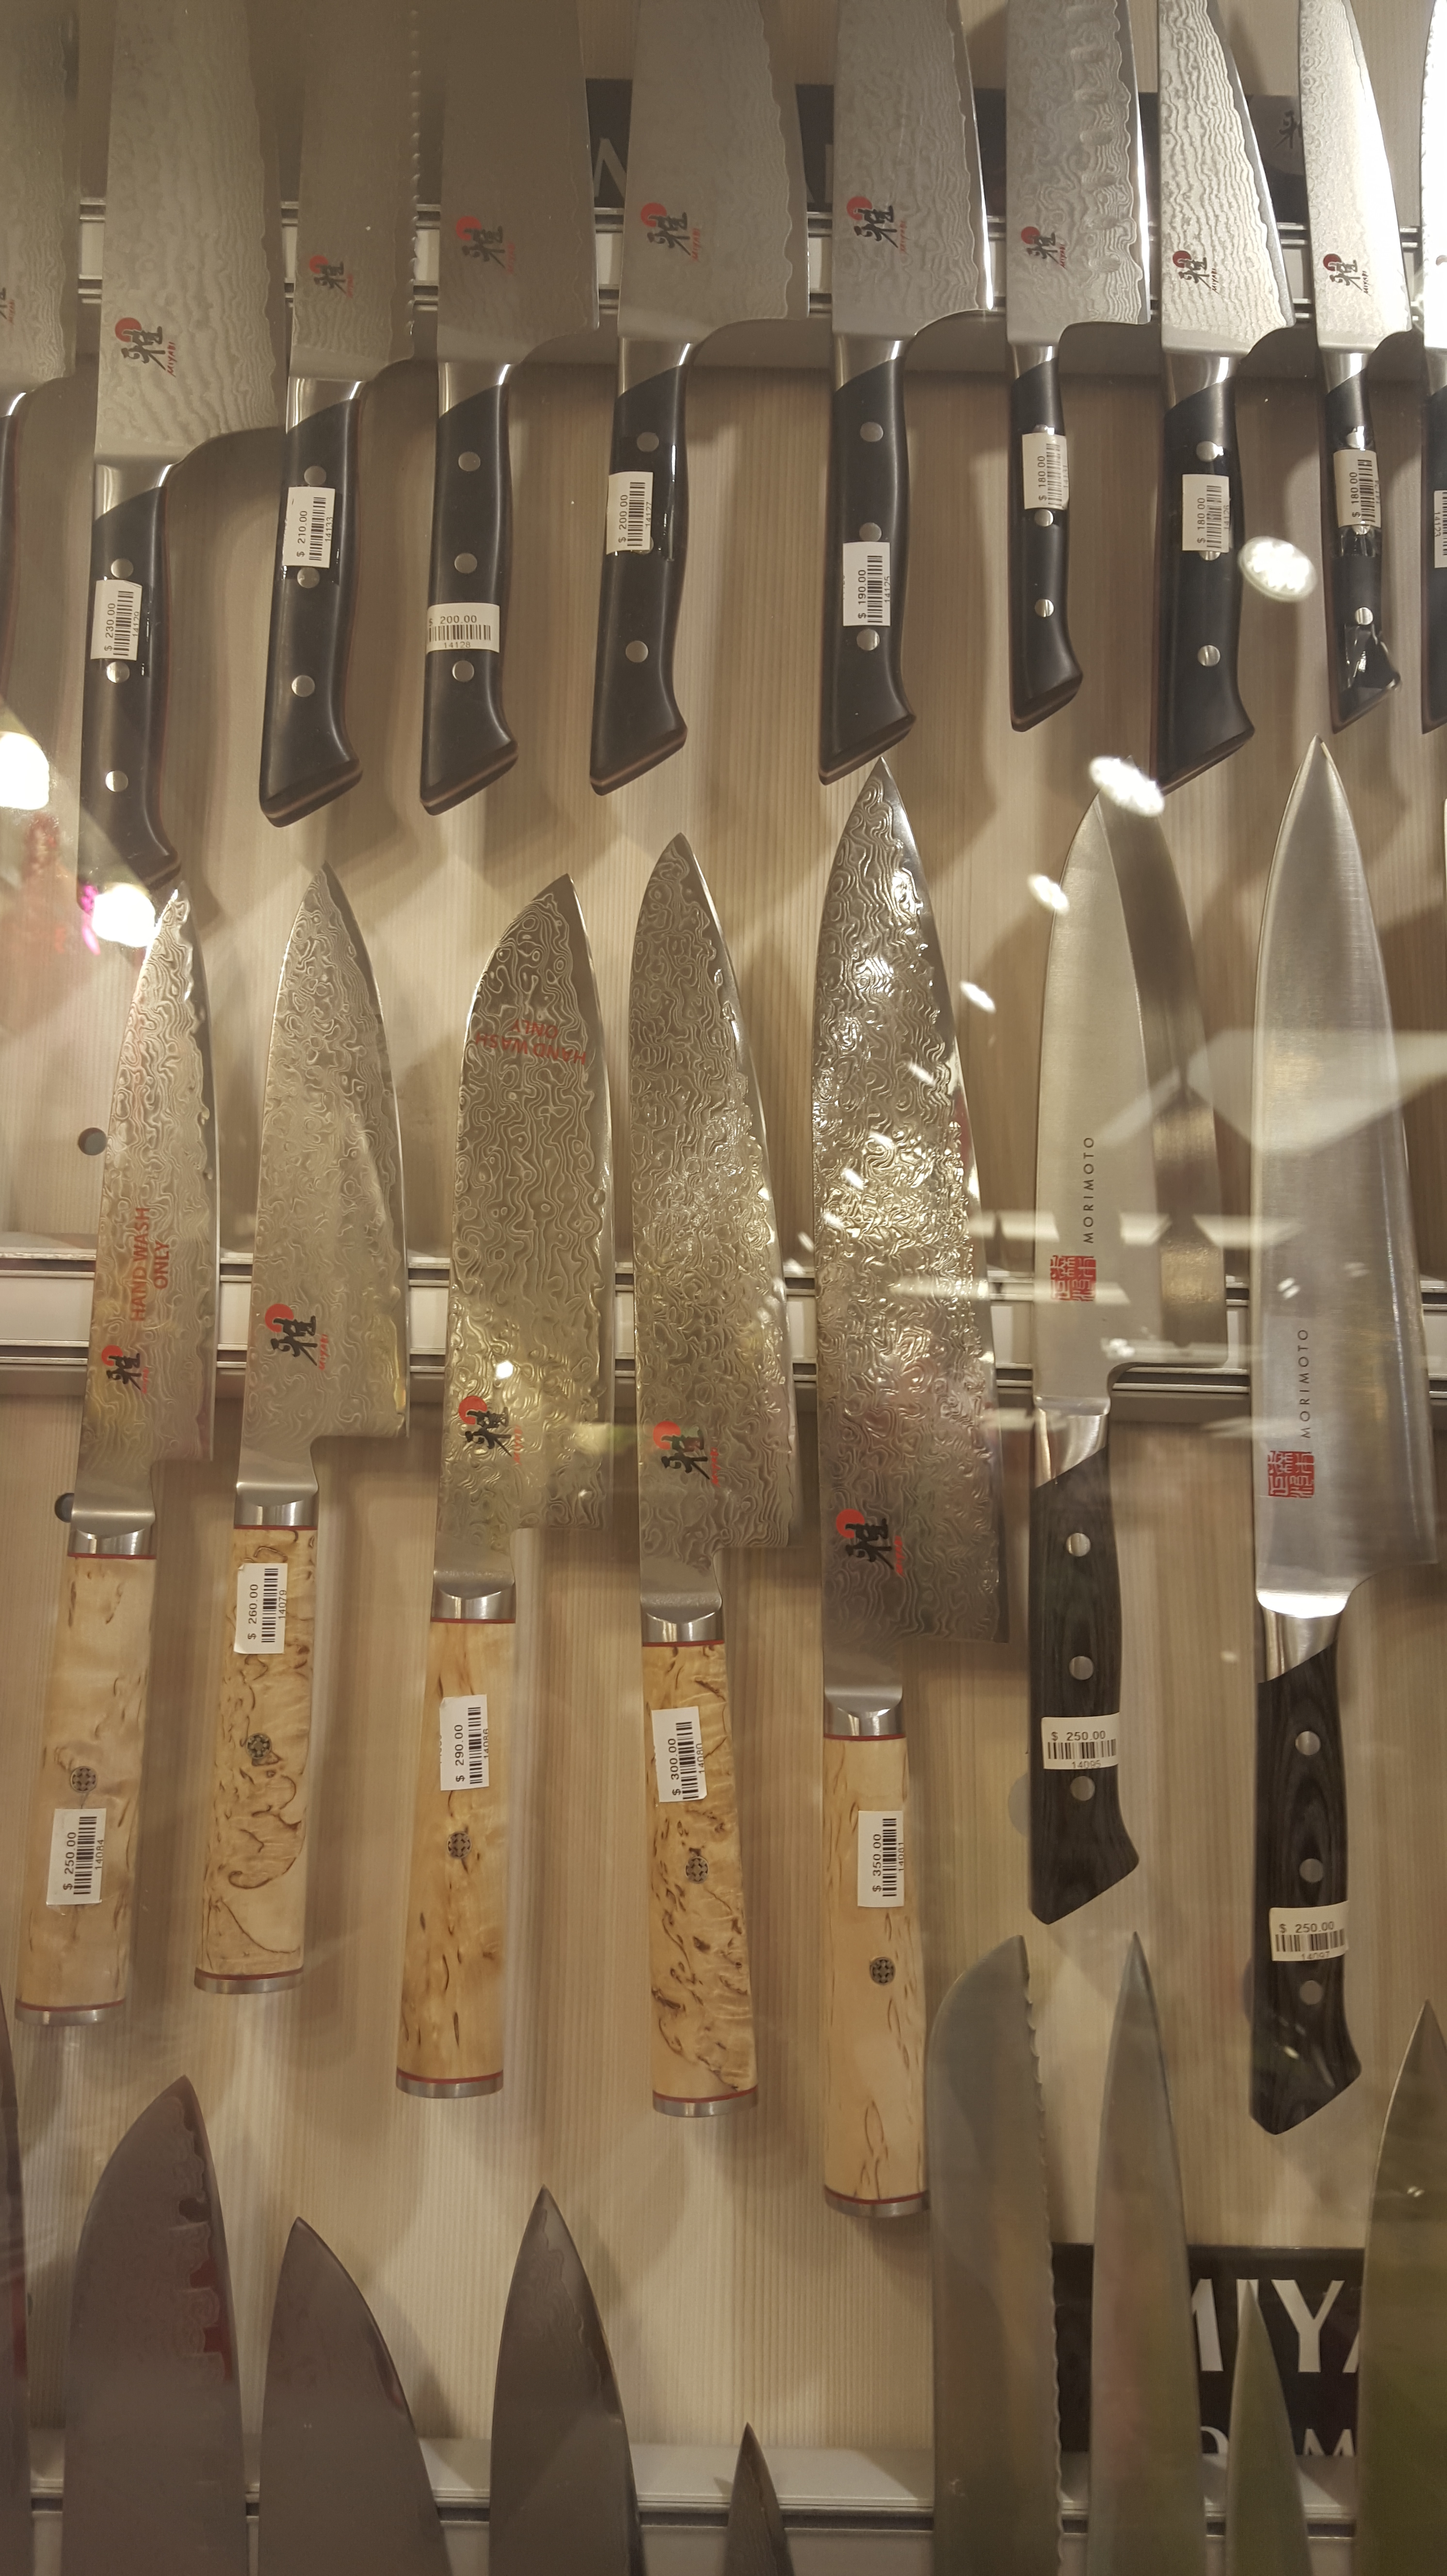
My favorite knife for home and professional use is the Wusthof “Super Slicer”.  It is the fifth knife from the left in the above picture, after the cleavers.  This knife has a thin, scalloped serrated edge that will slice through anything.  It makes the thinnest slices of bread, see-through slices of gravlax, it will peel and slice melons, and it carves meat thick or thin.

Morimoto Knives

Morimoto Knives

One good serrated knife, paring knife, and chef knife (8″ to 10″) will take care of most jobs in the kitchen for home cooking.  These knives might be a little pricey, but with proper care they will last a lifetime.  A sharpening steel will help keep them from getting too dull, but they will need to be professionally sharpened at least every two to three months, depending on how much you cook at home.

When storing your knives, keeping them in a wood block is good, if you would rather keep them in a drawer, you can get knife guards that cover the blades so that they can be stored safely. Do not wash you knives in the dishwasher!  The high heat and chemicals can damage the blade and warp the handles.  Always hand wash separately, do not put into the sink the other dirty dishes, in case someone else washes or you forget the knife is in the sink.  Dry the knives immediately and make sure they are completely dry before storing them.

Fissler Knives

Fissler Knives

If you can, buying from a restaurant supply store or a kitchen supply store will give you the best selection.  And gun stores.  We have one local gun store that has a nice selection of professional kitchen knives. Who knew?

Aloha and happy cooking!

Avocado Chive Hummus with Roasted Cauliflower and Asparagus

Cooking, Hawaiian Living
Chive Avocado Hummus with Roasted Cauliflower and Asparagus

Avocado Chive Hummus with Roasted Cauliflower and Asparagus

Avocados are one of my favorite ingredients to cook with and to eat! There are local avocados available year ’round, but they are best in the summer time.  And what better way to eat them but in hummus?  This hummus is good for sandwiches, as an appetizer (see picture above), and as a side dish.

Ingredients:

Ingredients for Chive Avocado Hummus

Ingredients for Avocado Chive Hummus

1 15.5 oz Can Garbanzo Beans (Liquid Reserved)

1/2 Medium Avocado

3 TBS Extra Virgin Olive Oil

2 TBS Chives, Chopped

2 TBS Lemon Juice

1 tsp Smoked Paprika

2 ea Garlic Cloves

TT Salt and Pepper

Pulse the ingredients in food processor or blender, except for 1 TBS of the chives, the garbanzo liquid, and the salt and pepper.  After pulsing, add liquid a couple tablespoons at a time until you get the consistency you like.  Then season with salt and pepper, to taste. After you take out the hummus, fold in the rest of the chives. This adds a little texture to the hummus and their color looks nice.

TIP*: The chives I used are Chinese garlic chives, they are stronger than regular chives and they are flat, not tubular.  If you can’t find either, green onion can be substituted.

The platter I made with the roasted cauliflower and asparagus is easy and quick to prepare for a side dish or an appetizer platter for bbq or picnic.  Slice the cauliflower whole, after cutting the bottom leaves off, about 1/2″ thick.  Then put them on a sheet pan with the asparagus and drizzle extra virgin olive oil over all of them.  Then turn the vegetables around to coat them with the oil and season with coarsely ground black pepper and sea salt.  Roast under the broiler for about 7 minutes, check them and take out the asparagus and broil the cauliflower about another 3 minutes.  You can also grill the vegetables on the bbq or on a grill pan.

The leftover cauliflower and asparagus can be made into sandwiches with the hummus.  And if you made the hummus and/or the vegetables for a bbq, add in any left over meat, fish, or chicken for a really hearty sandwich.

Live and eat with aloha everyday!

Asiago Fig Toast

Cooking, Hawaiian Living
Plated Asiago Fig Toast

Asiago Fig Toast

Fresh local figs are hard to come by in Hawaii.  There are figs available at the specialty grocery stores, but they are from the Mainland and very expensive. Figs remind me of summer, because growing up we always had a tree and we would pick and eat them fresh from the tree. This recipe is another way to enjoy figs, if you can’t get them fresh.

This recipe is easy and fast.  It can be eaten for breakfast, as a side to a salad or soup for lunch, as an appetizer for dinner or a cocktail party, or as a dessert.  I used a locally baked whole wheat pita bread that is thick without the usual pocket of traditional pita bread and I cut it in half.  Another bread that I like to use, and that is locally baked, is a multi-grain baguette. I would use it the same way, and cut the baguette in half length-wise.

Cutting the Pita in Half

Cutting the Pita in Half

You only need four ingredients:

Bread

Extra Virgin Olive Oil

Fig Butter

Asiago Cheese

Asiago Fig Toast Ingredients

Extra Virgin Olive Oil, Pita Bread, Fig Butter, Asiago Cheese

I used a “robust” olive oil, it’s not as fruity as traditional olive oils and it is good with foods that are sweeter, like the fig butter. The fig butter I bought on the Mainland, but they have it some grocery stores and in the specialty grocery stores.

Drizzle of Robust Extra Virgin Olive Oil on Each Half of Pita Bread

Drizzle of Extra Virgin Olive Oil on Each Half of Pita Bread

Drizzle the olive oil on each half of the bread, then spread the fig butter on each half and top with the asiago cheese.

Spread Fig Butter on Each Half of Pita Bread

Spread Fig Butter on Each Half of Pita Bread

Asiago Sprinkled on top of the Fig Butter

Asiago Sprinkled on top of the Fig Butter

Toast in a 350 degree oven until the cheese has melted and the edges of the bread are golden brown, about 5-7 minutes.

And, yes, I did eat the toast pictured here for breakfast!

Food for the Soul

Cooking, Hawaiian Living
Lechon on a Spit

Lechon on a Spit

Today my Auntie reminded me that it is my grandmother’s birthday.  She passed away only a few years ago and we still can taste her cooking as if it was yesterday. My auntie said she missed “Lola’s soul food”. She continued, “While “soul food” is usually used to describe African American cooking, “soul food” is color blind, and to me it simply means generational cooked passed on through loving family relationships.

Most people have recipes for their family’s “soul food”, but everyone has memories of the “soul food” prepared for family meals.  My siblings and I were lucky because both of my parents could cook.  Unfortunately, they never wrote anything down and didn’t refer to any cookbooks.  To this day, my sister still asks me for my mother’s sweet & sour sauce recipe, which I only know because I had watched her make it so many times.

There is always one “soul food” recipe that when you make it or you smell someone else’s version of it, it will bring back the memories of family meals and the love that was shared by all that gathered at the table.

Here is one of my “soul food” memories:

Adobong Manok – Chicken Adobo

3#       Chicken Pieces (Thighs, Whole Cut Fryer, etc.)

1/2 c   Soy Sauce

3/4 c   Apple Cider Vinegar

10 ea  Garlic Cloves, Crushed

2″ pc   Ginger, Sliced

2 ea    Bay Leaves

2 tsp   Whole Black Peppercorns

Salt to taste

Except for the salt, bring all ingredients to a boil and then simmer with the lid on for 30 minutes.  Remove lid and let simmer for another 10 minutes.  Add salt, if needed, and simmer for another 5 minutes. Remove chicken and strain sauce into a serving bowl, add chicken into bowl and enjoy.